You’ve seen it: a “too perfect” product shot that you still accept as truth for a split second. That’s visual realism psychology quietly flipping the trust switch in your brain. I’ve been designing long enough to remember when we argued about skeuomorphism - now we nitpick whether the shadow should be 12% softer to match a kitchen at 10 a.m. in Berlin. Cute. The harsh truth: people believe images that feel physically plausible, even when they know they’re synthetic. Ignore that, and your brand bleeds credibility.
Before you ask - no, this isn’t a love letter to deception. It’s a manual for realism perception in design: how to build digital visual believability ethically, so your audience understands the promise without mistaking it for the past. And if you want pro-quality, customizable assets that save your timeline (and your sanity), you know where to look. The platform exists to make pro-quality, customizable assets fast, combining AI output with human polish.
1) The Trust Switch: Why Realism Wins Even When It’s Declared “Fake”
Let’s be brutally honest: users aren’t running forensic labs on your hero banner. They’re pattern-matching. The brain screens for plausibility first, authenticity second. That’s why the psychology of realistic visuals outperforms clever “concept art” nine times out of ten on landing pages. Why realism builds trust comes down to three primitive checks:
- Light behaves: Direction, softness, falloff. If the highlight rolls like it would in daylight, the brain relaxes.
- Materials behave: Microtexture, edge wear, subsurface scatter. If leather reads plastic, trust evaporates.
- Context behaves: Scale, camera height, lens length. Put a coffee mug next to a laptop that’s somehow the size of a car door and watch bounce rates climb.
Users know images can be fake; their brains just reward anything that reduces cognitive drag. Nail the physics, earn the millisecond of belief you need for the click. For a deeper dive into photoreal mockups, study the standards shaping 2026.
2) Authenticity Signals vs. Authenticity Myths
Here’s where many designers faceplant. You paste “authentic” on a deck, then ship sterile renders with zero visual authenticity signals. Authenticity is not a sepia LUT, and it’s definitely not “add grain, call it a day.” The signals that matter:
- Lens truth: Subtle chromatic aberration, believable depth of field, natural sensor noise.
- Real-world imperfection: Slight fingerprints on glass, dust in the bokeh, micro-scratches on aluminum.
- Environmental coherence: Color temperature harmony across foreground/background, reflections that actually reflect the scene.
- Human evidence: When skin shows up, pore-level texture and imperfect hairlines - or don’t show it.
Myth-busting: Authentic ≠ unretouched. Authentic means coherent with reality’s rules. If your image telegraphs “the world behaved here,” users lean in. That’s visual authenticity in digital assets - honest about being synthetic, disciplined about being plausible. If you need a quick primer on surface detail and material nuance, this guide to realistic mockup textures is a fast shortcut.
3) The Believability Ladder (From “Stocky” to “Stop-Scrolling”)
When we unpack why people trust realistic mockups, I run clients up this ladder:
- Stylized Suggestion
Flat shadows, symbol-level forms. Cheap, fast, not conversion-grade. - Representational Clean
Decent geometry, generic lighting. Good for exploration, not public launch. - Physics-Aware
Correct reflections, focal depth, material definition. This is digital visual believability territory. - Environment-Integrated
Subject actually belongs: matching color temp, contact shadows, local bounce. - Documentary-Adjacent
The crown. If your mockup passes as a candid product shot at first glance, you’ve hit the standard.
Ship at Level 4 or 5. Below that is portfolio filler, not product. If you want a formal framework that maps neatly to this progression, see Ferwerda’s overview of varieties of realism in computer graphics.

4) The Minimal-Lie Checklist (How to Look Real Without Gaslighting Your Users)
Pin this to your monitor. If your image fails two or more checks, it’s not launch-ready.
- Light triangle: One key, one fill, one bounce - visible, consistent, measurable.
- Shadow sanity: Softness matches light size/distance; contact points are actually dark.
- Material ID pass: Can I identify metal, glass, fabric, skin by specular behavior alone?
- Scale cues: Hands, buttons, textures - do they align with a known reference?
- Camera honesty: Focal length plausible for the scene; no accidental “toy world.”
- Color temperature: Don’t mix 6500K highlights with 3200K shadows (unless there’s a story).
- Micro-variation: Break perfection - dust, lint, slight asymmetry. Reality is messy.
Packaging teams can sanity-check materials against dedicated packaging mockups before committing to production photography. For the science behind why cast/contact shadows sell depth and realism, see the review on the perception of cast shadows.
5) A Saner 30-Minute Workflow (Because You Don’t Get Paid to Babysit Shadows)
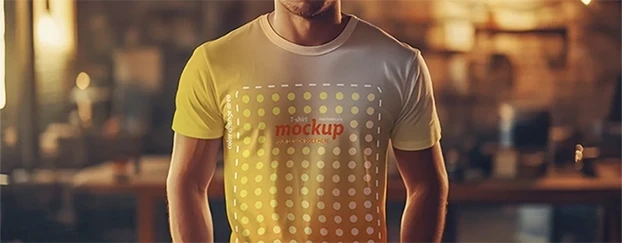
Here’s how to prep launch-ready visuals fast, using AI mockups, customizable templates, and high-resolution mockups - the grown-up way to hit deadlines without selling your soul:
Minute 0–5: Choose the right base
Pick a premium mockup that already nails camera angle and material realism. Don’t fix in post what you could choose in pre. Choose libraries with human-finished bases and calibrated lighting so you skip the “why does this metal look like wet clay?” phase.
Minute 5–12: Light and lens alignment
Match scene temperature to brand mood (cool “tech trust” vs. warm “lifestyle”). Set focal length to avoid the “cheap wide” look. Slight vignette only if the scene would naturally vignette.
Minute 12–18: Material truth pass
Edge wear on packaging, subtle anisotropy on brushed metal, believable translucency on plastics. If your template supports layered materials, use them - your graphic design assets are only as good as their shader honesty. For a deep dive into perception research, see material qualities in real-world images.
Minute 18–24: Human cues & micro-imperfections
Add a fingerprint on glass, a dust spec in highlights, a hint of label deformation from grip. You’re not “ruining” the design - you’re stopping the viewer from thinking “CG.”
Minute 24–28: Scale verification
Drop a known object (credit card = 85.6 mm) to sanity-check scale, then delete it. If label typography looks cartoonish at real size, better to catch it now than on a PDP.
Minute 28–30: Export & consistency sweep
Batch export consistent crops. Save ready-to-use presets for ad, PDP, and social - same lighting logic, different aspect ratios. Future-you will be grateful.
6) The Ethics Bit (Relax, It’s Not That Complicated)
Present hypotheticals as hypotheticals - clearly labeled - and keep them physically faithful. The promise is: “This is a faithful simulation of how the product will look and behave.” No impossible reflections, no fantasy materials, no anatomy that only exists in a render engine. You’re not lying; you’re prototyping expectations.
Also - use tools built for speed and professional results. Platforms that blend AI generation with human quality control respect the audience’s intelligence while helping you hit deadlines. Democratize pro visuals, keep standards high.
7) Quick Wins You Can Deploy Today
- Replace any “floating product in void” with a scene that has scale references.
- Audit shadows across your top 10 assets; mismatched softness is silent churn.
- Standardize camera heights by category (devices ≈ desk height, packaging ≈ hand height).
- Convert your five best scenes into AI-generated mockups + customizable templates for repeatable launch packs.
Yes, it’s boring. Yes, it works. Welcome to grown-up design.

FAQ
Q1: How do I apply visual realism psychology on a tight deadline without overhauling my entire workflow?
Start with a physics-honest base (photoreal AI mockups or high-resolution mockups refined by designers). Lock camera height and focal length across the set, then run the Minimal-Lie Checklist: light triangle, shadow sanity, material ID, color temperature. Add two human cues (dust, fingerprints), export consistent crops. That’s 80% of believability for 20% of effort.
Q2: What are the fastest authenticity signals to add when a client says “it still looks fake”?
Fix contact shadows first. Then correct color temperature to match the environment. Add micro-imperfections (edge wear, smudge on glass), and ensure DOF matches the camera distance. If one thing screams “CG,” it’s scale - verify with a known object before exporting.
Q3: Isn’t using AI-generated assets the opposite of authenticity?
Not if you’re honest about context and faithful to physics. AI can accelerate the boring parts while human finishing nails the plausibility. Your audience doesn’t reward suffering; they reward clarity and coherence with reality.